While looking at some pictures of Dale Chihuly's glass sculptures, I got an idea on how to make some simple sculptures with my third, fourth, and fifth graders using recycled materials common household materials. The students worked together to wrap the cardboard tubes from lamination rolls and covered them in foil. They twisted the ends of the foil at one end to make a point. They then spread out sheets of tissue paper on the tables and sprayed them with Elmer's Spray Adhesive. They then rolled the foil covered tubes on them to create the color. The bases are just small pieces of scrap wood with dowel rods nailed/glued on. Our PE Coach helped me make the bases during our conference period one day. Yay for great teammates! This was super easy but cool. We still have them displayed in the back hallway where you can see them from the inside or outside.
For a collaborative project my Kindergarten, First, and Second Graders created three Dale Chihuly inspired chandeliers made out of plastic. Each student was given a 3M brand lamination pouch. They opened the pouch and used two colors of permanent markers to color all over them. After they were done, I laminated them in our classroom laminator. (Fellow teachers, if you do not have one of these, get one. They are inexpensive and very useful for smaller projects. I personally think the lamination is thicker and better quality than typical laminators.) Once they were laminated, the students learned how to cut the film into spiral shapes by starting with a large circle. They then worked together to connect five or six spirals in the middle with pipe cleaners. As they completed this, they brought them to me and we worked together to hook the pipe cleaners all together. Once completed, we originally hung them up in the windows by the art room but they were too heavy and fell. So, we ended up combining them into one large chandelier and hung them on a rolling garment rack that I previously used for a pocket chart stand.
As a part of our school wide artist study over Dale Chihuly, the third through fifth graders explored how heat can change an object. I try to incorporate as many general education connections into art as possible. To recreate a kid friendly, safe version of Chihuly's glass art, the students used permanent markers to design a clear plastic cup. After the students were done designing, we went to the Kindergarten kitchen to experiment. The cups were placed on parchment paper on top of cookie sheets and placed in the oven at 350 degrees. The students took turns watching the changes in the cups. Once they were cooled, the students were able to take their "glass" sculptures home.
I did an artist study on Dale Chihuly with all of my students a few months ago. We looked at his various artworks, learned about the process to create glass, and then they made their own kid friendly version. Each student used washable markers to decorate a coffee filter in at least three colors. As they finished this step, they went to a station by the sink to spray their coffee filters with water. They were amazed at how the colors ran together. They then placed their coffee filters on top of a cup with a rubber band around it to hold it in place. After they dried, I sprayed them with spray starch to make the shapes hold. The students then glued them to a black cardstock base.
In January I was fortunate to be able to attend The College Football Foundation's Extra Yard for Teachers Summit in Dallas. The keynote speaker, Dr. Condolezza Rice, spoke to a packed crowd of teachers about the importance of education and what an important role we play in our community. There were many great speakers, musicians, and artists. Below is a painting that was created on stage in about twenty minutes. Amazing! You can watch videos of all of the speakers here.
Our district is an open choice district where families and students can apply for a school of their choice. To showcase different options within our district, they hold Grand Prairie ISD Experience each year. As a part of the experience, each school was able to show one piece of student artwork. Below is work that one of my fifth graders created. He drew the landscape and painted it with colors he mixed himself. He added baking soda to the white tempera paint to add texture and a more realistic look to the snow scene.
This is a lesson I always did when I taught first grade. Now that I'm in art, I extended it to a collaborative project for Kinder through Third Grade. Each student drew their favorite restaurant, their favorite store, and their home. They created roads, grass, trees, clouds, and various vehicles. After all classes had a chance to do this, they worked over the next few weeks to create a giant collage mural out of them. Once completed, their art project covered almost half of our back hallway which is pretty long. As they worked, we talked about what nouns were and how each thing they were creating was a noun. We talked about the role of different parts of a community to tie in Social Studies.
In December, my fourth and fifth graders made various small bowls made out of air-dry clay to sell for our district's Empty Bowls Project. The money raised from the sale of the bowls goes to a local charity that services our community's families. We sold the bowls on our campus and raised a few hundred dollars for the cause. Hopefully next year, we do even more! (Sorry, I don't have any pictures of the finished projects.)
Our school had a holiday door decorating contest during December. This was my contribution to the art room door. I created a giant gingerbread house with various pieces of candy and a friendly gingerbread man.
First Grade needed some practice back in December on how to draw objects in front of others. So, they practiced by drawing overlapping candy canes. They could make them whatever size and add whatever color patterns they wanted.
To experiment with color mixing and tape resist, the fifth grade students created birch trees. They first added three strips of painters tape to white construction paper. They then started with blue tempera paint and painted the middle section of the paper horizontally. They then added white to create a tint for the lower third of the paper. They added black to the blue tempera paint to create a darker shade for the top third. They then pulled off the tape to reveal the white. They added small details in blue to the birch trees to show texture.
Fourth Grade students performed "Show Me The Snow" for their music program this year. To go along with this and some previous lessons on viewpoints, they drew various shapes such as half circles, circles, and rectangles and pieced them together to make a person looking up to catch a snowflake. They added details such as hair to make it more like them.
We obviously went with a snowman theme in the younger grades during winter. For this lesson, I asked the third graders to take turns laying on the ground while others stood around them. We talked about how the view of their friends is different than if they are sitting or standing next to them. They then pretended that they were laying in snow somewhere and magical snowmen came to life and surrounded them. Using the corners of their square paper as reference starting points, they students created four snowmen with different details to show that perspective. They used oil pastels for their creations.
Second Graders also created snowmen but they created them by cutting paper. They traced various sized bowls for the body and head. They cut rectangles shapes for a scarf. They added various stripes and details to the scarves in a pattern. They also drew a triangle shape for a carrot nose. Before gluing it down, they positioned it in various locations to make the snowman appear that he was looking in different directions. We talked about how there was no need for eyes because if you pointed the nose upward, it makes the snowman appear as if its looking up.
I asked First Graders what a snowman would look like if they tilted their head to the left or to the right to begin a discussion on perspective. After the discussion, the students drew a snowman from one of the corners at an angle to show that perspective. They colored their snowmen with oil pastels and added various details such as scarves, mittens, hats, etc.
Kindergarten practiced fine motor skills by tracing circles of various sizes, cutting them out, and then arranging them however they chose to make it look like the snowman was looking up at the sky. Some of the kids chose to use four or five circles, some chose three, and some chose to use just two. They all turned out cute!
During December, since we had a short month, my students mostly worked on collaborative projects. These are some Christmas trees that they made out of tomato cages, mesh fabric, and zip ties. Once I modeled for them how to get started, they were able to easily complete these on their own. We decorated the stage with them and in front of the library. 4th Grade also used them for their holiday PTA program. Included is a picture of a sign the students and I made for their show using the school's poster maker, some die-cuts, scissors, and glue.
I have taken a break from blogging, with the exception of one post, since November. But, I have some unexpected free time today and some ideas I'd like to share. So, you will soon see an influx of posts dating back from the winter months through now.
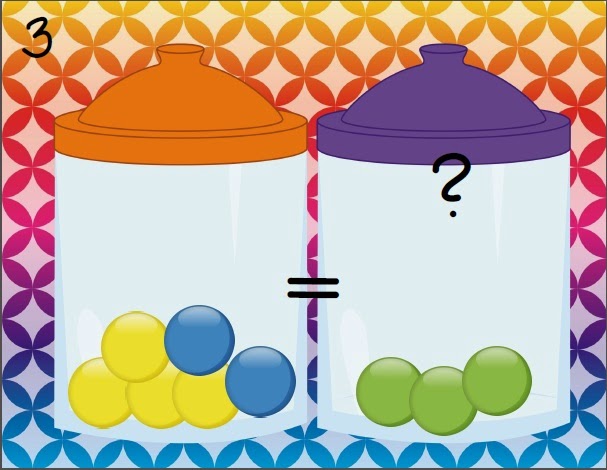
Although I teach visual arts now, I still create some general education materials by request. I was recently asked to come up with a math station activity for finding balanced equations. So, I came up with the concept of Lost Marbles. This “print and go” set of balanced equation problems for students to solve are a quick, low prep addition to math stations. Students add the two colors of marbles in the first jar to find the sum and use that sum to find the missing addend in the second jar to equal the same sum. Students can use manipulatives such as marbles, two-color counters, or beans to find the missing addend. The set includes sums from 4 to 10 and a blackline master to use for creating additional problems. Two versions of recording sheets are included for accountability. You can download the file from my TpT store.